m 1 revision imported |
|||
| (4 intermediate revisions by the same user not shown) | |||
| Line 1: | Line 1: | ||
<gallery position="left" spacing="medium" widths="250" captionalign="left">the_abyss.jpg | <gallery position="left" spacing="medium" widths="250" captionalign="left"> | ||
the_abyss.jpg|link=File:The_abyss.jpg | |||
</gallery> | </gallery> | ||
| Line 230: | Line 231: | ||
==<b><font color="yellow">'''Maps:'''</font></b>== | ==<b><font color="yellow">'''Maps:'''</font></b>== | ||
<gallery> | <gallery> | ||
Abyss.jpg|Dank's hand-drawn map of the upper dungeon levels in the Abyss, c. 1994. | Abyss.jpg|Dank's hand-drawn map of the upper dungeon levels in the Abyss, c. 1994.|link=File:Abyss.jpg | ||
Abyss | Abyss3.png|Lower levels of the Abyss, hand-drawn map c. 1994 by Dank. | ||
Abyss Levels 1-2.jpg|Google Drawing map of the first two levels of the Abyss by Dank, 2017. | Abyss Levels 1-2.jpg|Google Drawing map of the first two levels of the Abyss by Dank, 2017.|link=File:Abyss_Levels_1-2.jpg | ||
File:Abyss Level 3-4.jpg|Updated Google Drawing of the lower levels of the Abyss, with new detail of the Ancient Temple and Center of the Universe. (Dank, 2023) | File:Abyss Level 3-4.jpg|Updated Google Drawing of the lower levels of the Abyss, with new detail of the Ancient Temple and Center of the Universe. (Dank, 2023) | ||
</gallery> | </gallery> | ||
[[Category:Zones]] | [[index.php?title=Category:Zones]] | ||
[[Category:Skurge]] | [[index.php?title=Category:Skurge]] | ||
[[Category:High-Level Zones]] | [[index.php?title=Category:High-Level Zones]] | ||
[[Category:Quests]] | [[index.php?title=Category:Quests]] | ||
[[Category:Assembly]] | [[index.php?title=Category:Assembly]] | ||
[[Category:Boggs]] | [[index.php?title=Category:Boggs]] | ||
Latest revision as of 23:32, 19 January 2025

Area Designer:
Chris Boggs (Skurge for ApocalypseMUD)
Directions:
6s*2e*9s*3w*4s*2d (Midgaard Temple)
You may also enter the Abyss via the Pentragram Chamber Portal in the Lich's Tower.
6s*2e*2s*10e*4s*5w*4n*2w*3n*e*n*2w*u*2s*open door e*2e*n*open door w*4w*s*w (Midgaard Temple)
Reset Time:
- 48 minutes (occupied)
Story/History:
South of Midgaard and beyond the great river, hidden deep in a cave, lies entrance to the dread realm of the Abyss. The entrance itself is ruled over by the Balor, a fell demon. But beyond the gates lies the never-ending Abyss, a many-leveled place of demons and dark creatures. The lord of this dark realm is a hideous demon of supreme power, who waits until the end of time for his release from his prison. Even the bravest denizens of the land fear to tread the lower levels of this place...
Mobs of Note:
Argynos - (fire opal gauntlets, jade encrusted shield), Balor - (Balor's talisman, flaming whip), Demon Statue - (blood-red broadsword ), Dracolich - (diamond armor ), Erinyes - (flaming white onyx staff ), Black Abishai - (black amulet), Green Abishai - (green amulet), Lich - (disgusting candle black flame, staff of power), Pit Fiend - (fiend's hide, fiend's talon, demon heart, Mask of Hopelessness, golden key), small bright star, Red Abishai - (red amulet), Vampire - (cowl, ebon rose, flaming staff), Water Demon - (sapphire shield )
General Zone Strategy:
- Watch the DTs in the Abyss. Never go down in a room entitled "The Abyss."
- To avoid the evil aggressive mobs in the Abyss, remove lights. It's weird that cave dwellers can't see in the dark, but take advantage of it!
- The drow maidens at the northwest door to the Abyss reflect magic, earth and physical attacks. Plan accordingly if you feel the need to engage them. You can walk past them.
- Hidden spinagons provide great experience. The Lich will reflect physical attacks and reflects psionic attacks so beware when striking or brain imploding as you will be reduced to 1 HP. Any random evil aggros in the room will kill your Sohei or Jedi.
- The Pit Fiend is aggro, but can be calmed. Do it before melee, as the Fiend has memory. Once calmed, fully debuff him for maximum Pit Fiend enjoyment. The Fiend will prevent flee, tosses, Pzars!, and entropy, go prepare accordingly. The Pit Fiend can be blown up with a striking sohei.
- Find the Small White Star in the Center of the Universe through the portal behind the Pit Fiend's golden door (golden key).
- Argynos can be duoed after a full ranger debuff (fumble), bard debuff (slow, hopeless, rage), mage debuff (web, curse) and cleric debuff (blind, poison).
- If you're after the ebon rose component for the Blindsight, be sure to junk the coffin container at the Vampire room after checking. The coffin will block the ebon rose load.
Equipment:
| ITEM | TYPE | MOB | LOAD % | DISPLAY |
|---|---|---|---|---|
| cowl | about | vampire | mL 0 !g -3 ss | |
| fiend hide, shirt | body | Erinyes | mL 0 !m !g 21 ac -6 acM -3 ss ench! | |
| flaming staff made of white onyx | weapon | Erinyes | 20.0% | mL 10 cmsa! !g 2D6 7.0 avg 1 hit 25 mana dependent on fiend hide shirt load
dependent on fiend hide skirt load |
| fiend hide skirt | leg | Erinyes | mL 0 !m !g 6 ac 1 str | |
| the fiend's talon | weapon | pit fiend | 35.0% | mL 15 !mctpnjsrb !g 4D7 16.0 avg 2 hit 2 dam |
| heart of a great demon | hold | pit fiend | <1% | mL 15 10% hpR -10 hp |
| mask of hopelessness | face | pit fiend | <1% | mL 0 a! e -2 align |
| trident, black | weapon | spinagon | 16.0% | mL 0 !mctn !g 3D4 7.5 avg -2 str 2 dex |
| broadsword, blood-red* | weapon | demon statue | 17.0% | mL 0 !mc e! 2D5 6.0 avg |
| black | scroll | gargoyle | mL 0 !twn 1 x harm | |
| disgusting candle with a black flame | light | Lich | mL 12 !mcp e 2 hit 1 dam | |
| fire opal gauntlets | hand | Argynos | mL 10 !mctasrb 6 ac 12 hp perma bless | |
| blood-red broadsword | weapon | demon statue | mL 0 !mc e! 3D5 9.0 avg 3 dam 2 str | |
| golden key | key | pit fiend | 17.0% | mL 0 !rests golden door |
| jade encrusted gold shield | shield | Argynos | mL 0 !mc 4 ac -2 hit 15 hp | |
| key, coffin | key | vampire | mL 0 !rests | |
| axe, huge battle | weapon | gargoyle | mL 0 !mtcn 2D10 11.0 avg -2 hit 2 dam | |
| large coffin | container | Vampire | mL 0 !rests | |
| amulet, red | neck | red abishai | 35.0% | mL 0 !rests 2 hit |
| the green amulet | neck | green abishai | 25.0% | mL 0 !rests 2 ac 5% hpR |
| black amulet | neck | black abishai | 50.0% | mL 0 !rests 2 ac -1 dex 15 hp |
| ring, crystal | ring | gargoyle | mL 0 !rests 2 con | |
| rose, ebon | component | vampire coffin | 10.0% | mL 0 !rests !rent |
| sphere of invulnerability | hold | vampire | 17.0% | mL 10 m! 10 ac -10 ss save breath |
| staff of power | owand | Lich | 17.0% | mL 13 !twn 3 x earthquake |
| staff, flaming | wand | vampire coffin | 100.0% | mL 0 !twn 5 x control weather |
| suit of diamond armor | body | Dracolich (Golden Dragon) | 25.0% | mL 15 !mtj 33 ac 2 str 5% hpR |
| the sapphire shield | shield | water demon | 25.0% | mL 15 !msb 12 ac 1 dam -1 dex |
| scimitar, rusted | weapon | skeleton | mL 0 !cm 1D5 3.0 avg | |
| vial, pitch black | potion | gargoyle | mL 0 !rests 1 x cure serious
1 x cure blind |
Room List:
For a complete listing of the rooms in the Abyss, click here.
Maps:
-
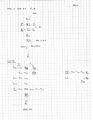 Dank's hand-drawn map of the upper dungeon levels in the Abyss, c. 1994.
 -
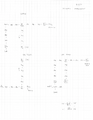 Lower levels of the Abyss, hand-drawn map c. 1994 by Dank.
 -
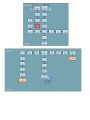 Google Drawing map of the first two levels of the Abyss by Dank, 2017.
 -
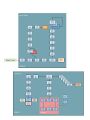 Updated Google Drawing of the lower levels of the Abyss, with new detail of the Ancient Temple and Center of the Universe. (Dank, 2023)


index.php?title=Category:Zones index.php?title=Category:Skurge index.php?title=Category:High-Level Zones index.php?title=Category:Quests index.php?title=Category:Assembly index.php?title=Category:Boggs